> ## Documentation Index
> Fetch the complete documentation index at: https://docs.pylar.ai/llms.txt
> Use this file to discover all available pages before exploring further.
# Quick Start
> Get started with Pylar in minutes - connect databases, create views, build MCP tools, and deploy to your AI agents
## Prerequisites
Before you begin, make sure you have:
* **Pylar Account**: Sign up at [pylar.ai](https://www.pylar.ai)
* **Database Credentials**: Access to at least one supported database or data warehouse
* **AI Agent Builder**: An agent builder that supports MCP tools (Claude Desktop, Cursor, Windsurf, or custom)
Don't have a Pylar account yet? [Sign up for free](https://www.pylar.ai) to get started.
## Step 1: Connect Your Databases
Start by connecting Pylar to your data sources. You can connect multiple databases and warehouses.
### Supported Data Sources
Pylar supports a wide range of data sources:
* **BigQuery**
* **Snowflake**
* **PostgreSQL**
* **MySQL**
* **Redshift**
* **AlloyDB**
* **Databricks**
* **And more...**
### Add a Connection
1. Log in to your [Pylar dashboard](https://dashboard.pylar.ai)
2. Navigate to **Connections** → **Add Connection**
3. Select your database type
4. Enter your connection credentials
5. Test the connection and save
Start with a development or staging database to test Pylar before connecting production systems.
Your credentials are encrypted and stored securely. Pylar never exposes your raw database credentials to AI agents.
## Step 2: Create a Project
Projects are containers for your views and MCP tools. All your work is organized within projects.
1. From the dashboard, click **Create Project**
2. Give your project a name (e.g., "Customer Analytics" or "Error Monitoring")
3. Optionally add a description
4. Click **Create**
Your project is now ready. You can create multiple projects to organize different use cases or teams.
## Step 3: Create Your First View
Views define what data AI agents can access. They're the only level of access agents get—no raw database access.
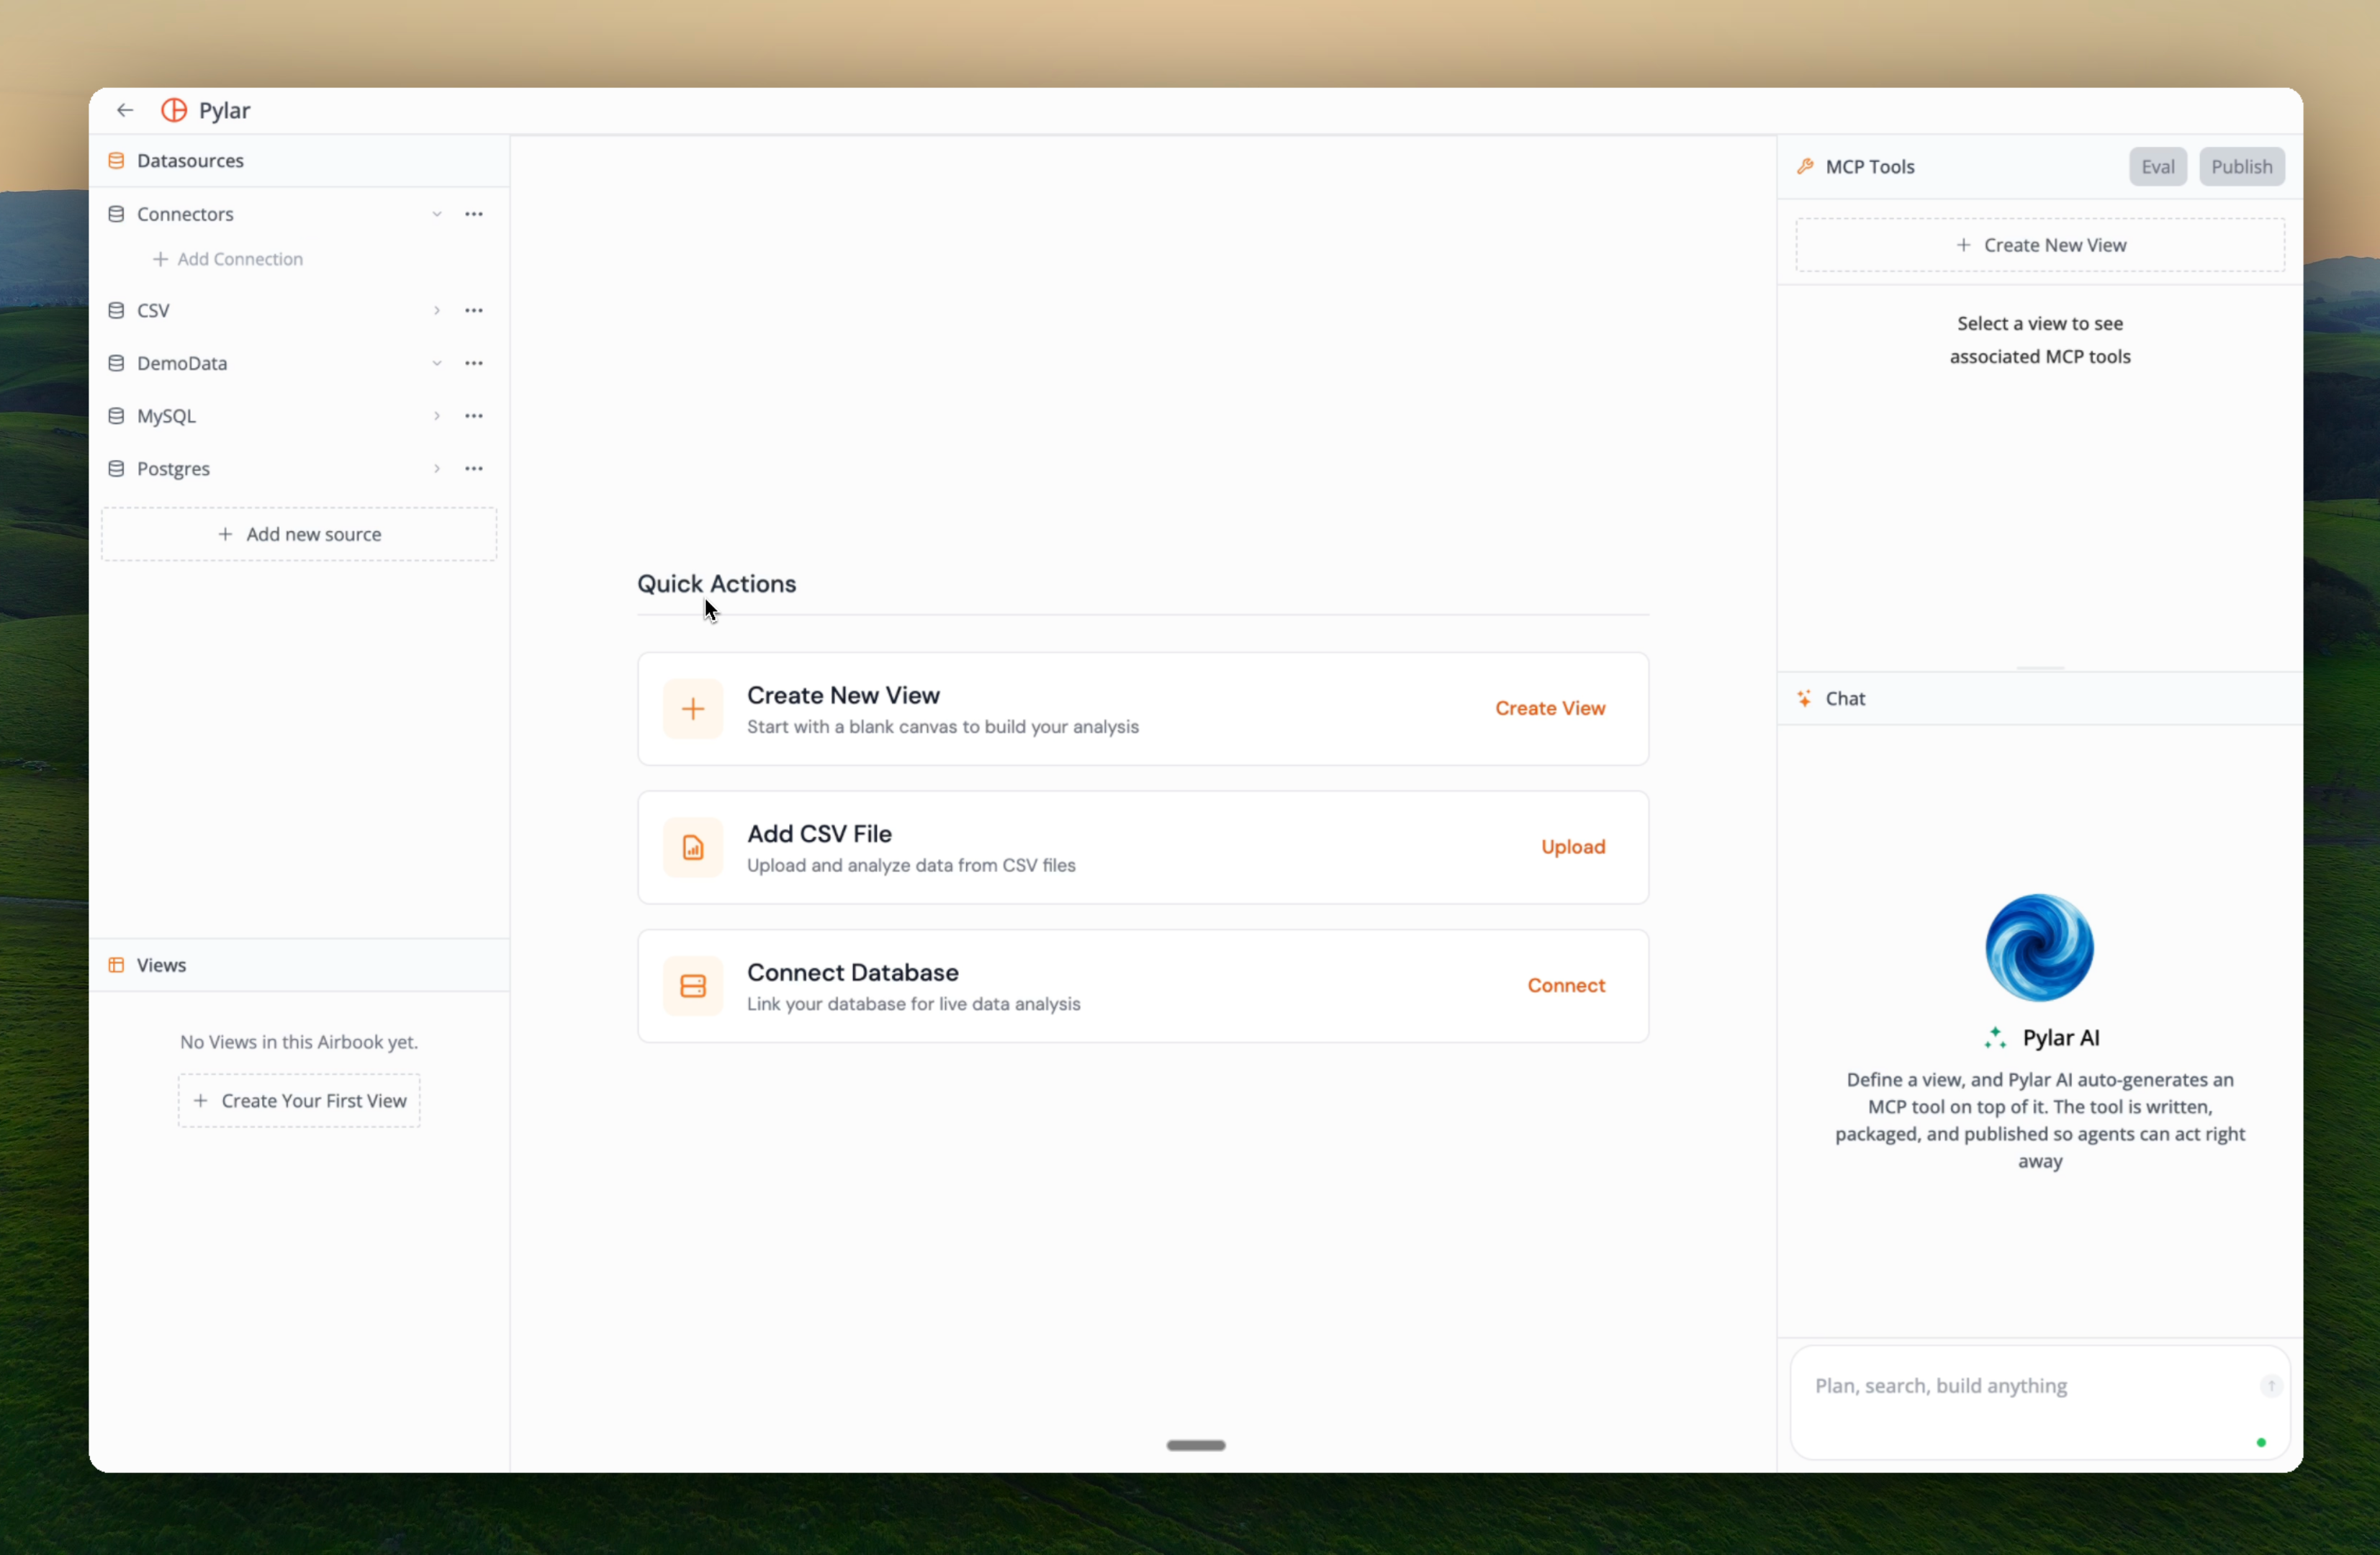
### Open the SQL IDE
1. In your project, click **Create View**
2. The SQL IDE opens with your available data sources
 ### Select Your Data Source
1. Choose a data source from the dropdown
2. You can see available databases, schemas, and tables
3. Select the database you want to query
### Write Your Query
Use the SQL IDE to write your query. You can:
* **Query Single Tables**: Select from individual tables
* **Join Multiple Tables**: Combine data from multiple tables
* **Cross-Database Joins**: Join across different databases and warehouses in a single query
* **Apply Filters**: Use WHERE clauses to filter data
* **Aggregate Data**: Use GROUP BY, aggregations, and window functions
Pylar's SQL IDE supports all standard SQL operations. You can write complex queries just like you would in any SQL editor.
### Example: Customer Analytics View
```sql theme={null}
-- Customer Analytics View
-- This view provides aggregated customer data for AI analysis
-- without exposing PII or sensitive financial details
SELECT
c.customer_id,
c.region,
c.signup_date,
COUNT(o.order_id) as total_orders,
SUM(o.amount) as total_revenue,
AVG(o.amount) as avg_order_value,
MAX(o.order_date) as last_order_date
FROM customers c
LEFT JOIN orders o ON c.customer_id = o.customer_id
WHERE c.is_active = true
GROUP BY c.customer_id, c.region, c.signup_date;
```
### Example: Cross-Database Join
```sql theme={null}
-- Join data across multiple databases
SELECT
customers.name,
orders.total,
payments.status
FROM bigquery.production.customers customers
JOIN snowflake.analytics.orders orders
ON customers.id = orders.customer_id
JOIN postgres.payments.payments payments
ON orders.id = payments.order_id
WHERE orders.date >= '2024-01-01';
```
### Save Your View
1. Click **Save View** when your query is ready
2. Give your view a descriptive name
3. Add a description (this helps when creating MCP tools)
4. Your view is now saved in your project
Test your query in the SQL IDE before saving. You can preview results to ensure the data looks correct.
## Step 4: Create MCP Tools
Once your view is created, you can build MCP tools that govern how AI agents interact with your data. You can create multiple MCP tools on a single view, each with different purposes.
### Method 1: Create with AI (Recommended)
Use natural language to describe what you want, and Pylar's AI will configure the MCP tool for you.
1. Click **Create MCP Tool** on your view
2. Select **Create with AI**
3. Write a natural language prompt describing what you want:
Example prompts:
* *"Create a tool to fetch error codes, events, and deal information"*
* *"Build a tool that returns customer analytics by region"*
* *"Make a tool to get order history for a specific customer"*
4. Pylar's AI will:
* Understand your intent
* Configure tool parameters
* Generate tool descriptions
* Set up the tool schema
5. Review the generated tool configuration
6. Make any adjustments if needed
7. Click **Save Tool**
### Method 2: Create Manually
For more control, you can configure the tool manually:
1. Click **Create MCP Tool** on your view
2. Select **Create Manually**
3. Configure:
* **Tool Name**: Descriptive name for the tool
* **Description**: What the tool does
* **Parameters**: Input parameters the tool accepts
* **Query Logic**: How parameters map to your SQL view
* **Response Format**: Structure of returned data
4. Click **Save Tool**
You can create multiple MCP tools on the same view. Each tool can have different parameters, filters, or purposes, giving you flexibility in how agents interact with your data.
## Step 5: Test Your MCP Tools
Before deploying, test your MCP tools to ensure they work correctly.
1. Click on any MCP tool you've created
2. Select **Test Tool**
3. Enter test parameters
4. Click **Run Test**
5. Review the results:
* Verify the query executes correctly
* Check the response format
* Ensure data is returned as expected
* Look for any errors
Testing helps catch issues before deploying to production. Test with various parameter combinations to ensure robustness.
## Step 6: Publish Your Tools
Once your MCP tools are ready, publish them to make them available to AI agents.
1. In your project, click **Publish**
2. Pylar generates:
* **MCP Server Link**: A unique URL for your tools
* **Header Token**: An authentication token for secure access
3. Copy both the link and the header token
Keep your header token secure. It provides access to your data views. Don't share it publicly or commit it to version control.
## Step 7: Connect to Your Agent Builder
Add your published tools to any agent builder that supports MCP.
### Add to Agent Builder
1. Open your agent builder (Claude Desktop, Cursor, Windsurf, etc.)
2. Navigate to MCP configuration settings
3. Add a new MCP server:
* **Server URL**: Paste your MCP server link
* **Authorization Header**: Add your header token (format: `Bearer YOUR_TOKEN`)
4. Save and restart your agent
### Verify Connection
1. In your agent, ask it to use your new tool
2. The agent should be able to access your data view
3. Test a few queries to ensure everything works
Your tools are now live! The agent can query your data through the governed views you created.
## Step 8: Monitor with Evals
Once your agent is running, use Pylar's Evals to understand how agents interact with your views.
### Access Evals
1. In your Pylar dashboard, click **Evals**
2. Select your project and view
3. Explore comprehensive analytics
### What You'll See
Evals provide in-depth insights:
* **Interaction Patterns**: How agents are using your tools
* **Success vs. Errors**: Track successful queries and failures
* **Error Analysis**: Detailed breakdown of errors:
* What errors occurred
* When they happened
* Why they failed
* How to fix them
* **Query Shape**: Understand the types of queries agents are making
* **Raw Logs**: Access full query logs for debugging
### Use Evals to Improve
Based on evals insights, you can:
1. **Adjust View Scope**: Modify your SQL views to include or exclude data
2. **Refine MCP Tools**: Update tool parameters or descriptions
3. **Add New Tools**: Create additional tools for common use cases
4. **Fix Errors**: Address issues revealed in the error analysis
Evals help you iteratively improve your views and tools. Make adjustments on the Pylar platform, and changes automatically reflect in all connected agent builders.
## Iterate and Improve
One of Pylar's key features is the ability to iterate without disruption.
### Make Changes Anytime
You can adjust:
* **SQL Queries**: Update your view queries to change data scope
* **View Definitions**: Modify what data is included
* **MCP Tools**: Add, remove, or modify tools
* **Tool Configurations**: Update parameters or descriptions
### Changes Reflect Automatically
1. Make your changes in the Pylar platform
2. Changes are automatically reflected in all connected agent builders
3. No need to redeploy or reconfigure agents
4. Agents immediately have access to updated views and tools
Start simple and expand based on evals insights. You can always refine your views and tools as you learn how agents interact with your data.
## Key Concepts
### Views Are the Only Access Level
**Important**: AI agents never get raw database access. They can only query through the views you create. This means:
* ✅ Complete control over what data agents can see
* ✅ No risk of agents accessing unauthorized data
* ✅ All queries go through your defined views
* ✅ Full audit trail of all data access
### Multiple Tools on One View
A single view can have multiple MCP tools, each with different purposes:
* Different parameter sets
* Different query filters
* Different use cases
* Different agent interaction patterns
This flexibility lets you tailor how different agents or use cases interact with the same underlying data.
## Next Steps
Now that you have the basics:
* [What is Pylar?](/introduction/what-is-pylar) - Deep dive into Pylar's capabilities
* [Why Pylar?](/introduction/why-pylar) - Understand the benefits
* Explore advanced features like cross-database joins and complex queries
* Build more views and tools for different use cases
* Use Evals to optimize your tools based on real usage
Our support team is here to help you succeed with Pylar
### Select Your Data Source
1. Choose a data source from the dropdown
2. You can see available databases, schemas, and tables
3. Select the database you want to query
### Write Your Query
Use the SQL IDE to write your query. You can:
* **Query Single Tables**: Select from individual tables
* **Join Multiple Tables**: Combine data from multiple tables
* **Cross-Database Joins**: Join across different databases and warehouses in a single query
* **Apply Filters**: Use WHERE clauses to filter data
* **Aggregate Data**: Use GROUP BY, aggregations, and window functions
Pylar's SQL IDE supports all standard SQL operations. You can write complex queries just like you would in any SQL editor.
### Example: Customer Analytics View
```sql theme={null}
-- Customer Analytics View
-- This view provides aggregated customer data for AI analysis
-- without exposing PII or sensitive financial details
SELECT
c.customer_id,
c.region,
c.signup_date,
COUNT(o.order_id) as total_orders,
SUM(o.amount) as total_revenue,
AVG(o.amount) as avg_order_value,
MAX(o.order_date) as last_order_date
FROM customers c
LEFT JOIN orders o ON c.customer_id = o.customer_id
WHERE c.is_active = true
GROUP BY c.customer_id, c.region, c.signup_date;
```
### Example: Cross-Database Join
```sql theme={null}
-- Join data across multiple databases
SELECT
customers.name,
orders.total,
payments.status
FROM bigquery.production.customers customers
JOIN snowflake.analytics.orders orders
ON customers.id = orders.customer_id
JOIN postgres.payments.payments payments
ON orders.id = payments.order_id
WHERE orders.date >= '2024-01-01';
```
### Save Your View
1. Click **Save View** when your query is ready
2. Give your view a descriptive name
3. Add a description (this helps when creating MCP tools)
4. Your view is now saved in your project
Test your query in the SQL IDE before saving. You can preview results to ensure the data looks correct.
## Step 4: Create MCP Tools
Once your view is created, you can build MCP tools that govern how AI agents interact with your data. You can create multiple MCP tools on a single view, each with different purposes.
### Method 1: Create with AI (Recommended)
Use natural language to describe what you want, and Pylar's AI will configure the MCP tool for you.
1. Click **Create MCP Tool** on your view
2. Select **Create with AI**
3. Write a natural language prompt describing what you want:
Example prompts:
* *"Create a tool to fetch error codes, events, and deal information"*
* *"Build a tool that returns customer analytics by region"*
* *"Make a tool to get order history for a specific customer"*
4. Pylar's AI will:
* Understand your intent
* Configure tool parameters
* Generate tool descriptions
* Set up the tool schema
5. Review the generated tool configuration
6. Make any adjustments if needed
7. Click **Save Tool**
### Method 2: Create Manually
For more control, you can configure the tool manually:
1. Click **Create MCP Tool** on your view
2. Select **Create Manually**
3. Configure:
* **Tool Name**: Descriptive name for the tool
* **Description**: What the tool does
* **Parameters**: Input parameters the tool accepts
* **Query Logic**: How parameters map to your SQL view
* **Response Format**: Structure of returned data
4. Click **Save Tool**
You can create multiple MCP tools on the same view. Each tool can have different parameters, filters, or purposes, giving you flexibility in how agents interact with your data.
## Step 5: Test Your MCP Tools
Before deploying, test your MCP tools to ensure they work correctly.
1. Click on any MCP tool you've created
2. Select **Test Tool**
3. Enter test parameters
4. Click **Run Test**
5. Review the results:
* Verify the query executes correctly
* Check the response format
* Ensure data is returned as expected
* Look for any errors
Testing helps catch issues before deploying to production. Test with various parameter combinations to ensure robustness.
## Step 6: Publish Your Tools
Once your MCP tools are ready, publish them to make them available to AI agents.
1. In your project, click **Publish**
2. Pylar generates:
* **MCP Server Link**: A unique URL for your tools
* **Header Token**: An authentication token for secure access
3. Copy both the link and the header token
Keep your header token secure. It provides access to your data views. Don't share it publicly or commit it to version control.
## Step 7: Connect to Your Agent Builder
Add your published tools to any agent builder that supports MCP.
### Add to Agent Builder
1. Open your agent builder (Claude Desktop, Cursor, Windsurf, etc.)
2. Navigate to MCP configuration settings
3. Add a new MCP server:
* **Server URL**: Paste your MCP server link
* **Authorization Header**: Add your header token (format: `Bearer YOUR_TOKEN`)
4. Save and restart your agent
### Verify Connection
1. In your agent, ask it to use your new tool
2. The agent should be able to access your data view
3. Test a few queries to ensure everything works
Your tools are now live! The agent can query your data through the governed views you created.
## Step 8: Monitor with Evals
Once your agent is running, use Pylar's Evals to understand how agents interact with your views.
### Access Evals
1. In your Pylar dashboard, click **Evals**
2. Select your project and view
3. Explore comprehensive analytics
### What You'll See
Evals provide in-depth insights:
* **Interaction Patterns**: How agents are using your tools
* **Success vs. Errors**: Track successful queries and failures
* **Error Analysis**: Detailed breakdown of errors:
* What errors occurred
* When they happened
* Why they failed
* How to fix them
* **Query Shape**: Understand the types of queries agents are making
* **Raw Logs**: Access full query logs for debugging
### Use Evals to Improve
Based on evals insights, you can:
1. **Adjust View Scope**: Modify your SQL views to include or exclude data
2. **Refine MCP Tools**: Update tool parameters or descriptions
3. **Add New Tools**: Create additional tools for common use cases
4. **Fix Errors**: Address issues revealed in the error analysis
Evals help you iteratively improve your views and tools. Make adjustments on the Pylar platform, and changes automatically reflect in all connected agent builders.
## Iterate and Improve
One of Pylar's key features is the ability to iterate without disruption.
### Make Changes Anytime
You can adjust:
* **SQL Queries**: Update your view queries to change data scope
* **View Definitions**: Modify what data is included
* **MCP Tools**: Add, remove, or modify tools
* **Tool Configurations**: Update parameters or descriptions
### Changes Reflect Automatically
1. Make your changes in the Pylar platform
2. Changes are automatically reflected in all connected agent builders
3. No need to redeploy or reconfigure agents
4. Agents immediately have access to updated views and tools
Start simple and expand based on evals insights. You can always refine your views and tools as you learn how agents interact with your data.
## Key Concepts
### Views Are the Only Access Level
**Important**: AI agents never get raw database access. They can only query through the views you create. This means:
* ✅ Complete control over what data agents can see
* ✅ No risk of agents accessing unauthorized data
* ✅ All queries go through your defined views
* ✅ Full audit trail of all data access
### Multiple Tools on One View
A single view can have multiple MCP tools, each with different purposes:
* Different parameter sets
* Different query filters
* Different use cases
* Different agent interaction patterns
This flexibility lets you tailor how different agents or use cases interact with the same underlying data.
## Next Steps
Now that you have the basics:
* [What is Pylar?](/introduction/what-is-pylar) - Deep dive into Pylar's capabilities
* [Why Pylar?](/introduction/why-pylar) - Understand the benefits
* Explore advanced features like cross-database joins and complex queries
* Build more views and tools for different use cases
* Use Evals to optimize your tools based on real usage
Our support team is here to help you succeed with Pylar