> ## Documentation Index
> Fetch the complete documentation index at: https://docs.pylar.ai/llms.txt
> Use this file to discover all available pages before exploring further.
# Connecting Redshift
> Step-by-step guide to connecting your Amazon Redshift data warehouse to Pylar
## Overview
Connecting Pylar to Redshift allows you to harness the power of your Redshift data for analysis and insights. Your data remains in Redshift—Pylar indexes it for easier querying and executes queries on your Redshift infrastructure.
## Prerequisites
* ✅ Pylar account with Analyst role or higher
* ✅ Amazon Redshift cluster access
* ✅ Redshift endpoint URL
* ✅ AWS username and password for Redshift
* ✅ Ability to modify security group settings (for IP whitelisting)
## Step 1: Prepare Your Redshift Database
Before connecting, ensure:
1. Your Redshift database is **accessible from outside your VPC network**
2. You have the Redshift endpoint URL
3. You have AWS credentials (username and password) for Redshift
4. You can modify security groups to whitelist IP addresses
This is crucial for allowing Pylar to query your data. If your Redshift cluster is in a private VPC, you may need to configure network access or use an SSH tunnel.
## Step 2: Retrieve Endpoint Information
1. Open your **Redshift application** or AWS Console
2. Navigate to your Redshift cluster
3. Copy the **endpoint URL**
**Format**: The endpoint typically looks like:
```
my-cluster.abc123.us-east-1.redshift.amazonaws.com:5439
```
## Step 3: Navigate to Pylar Connections
1. Switch to your Pylar workspace
2. Click on the **"Connections"** tab located in the sidebar
3. You'll see the list of available data sources
## Step 4: Select Redshift Connector
From the list of available data sources, select **"Redshift"**.
The connection setup screen will open.
## Step 5: Enter Connection Details
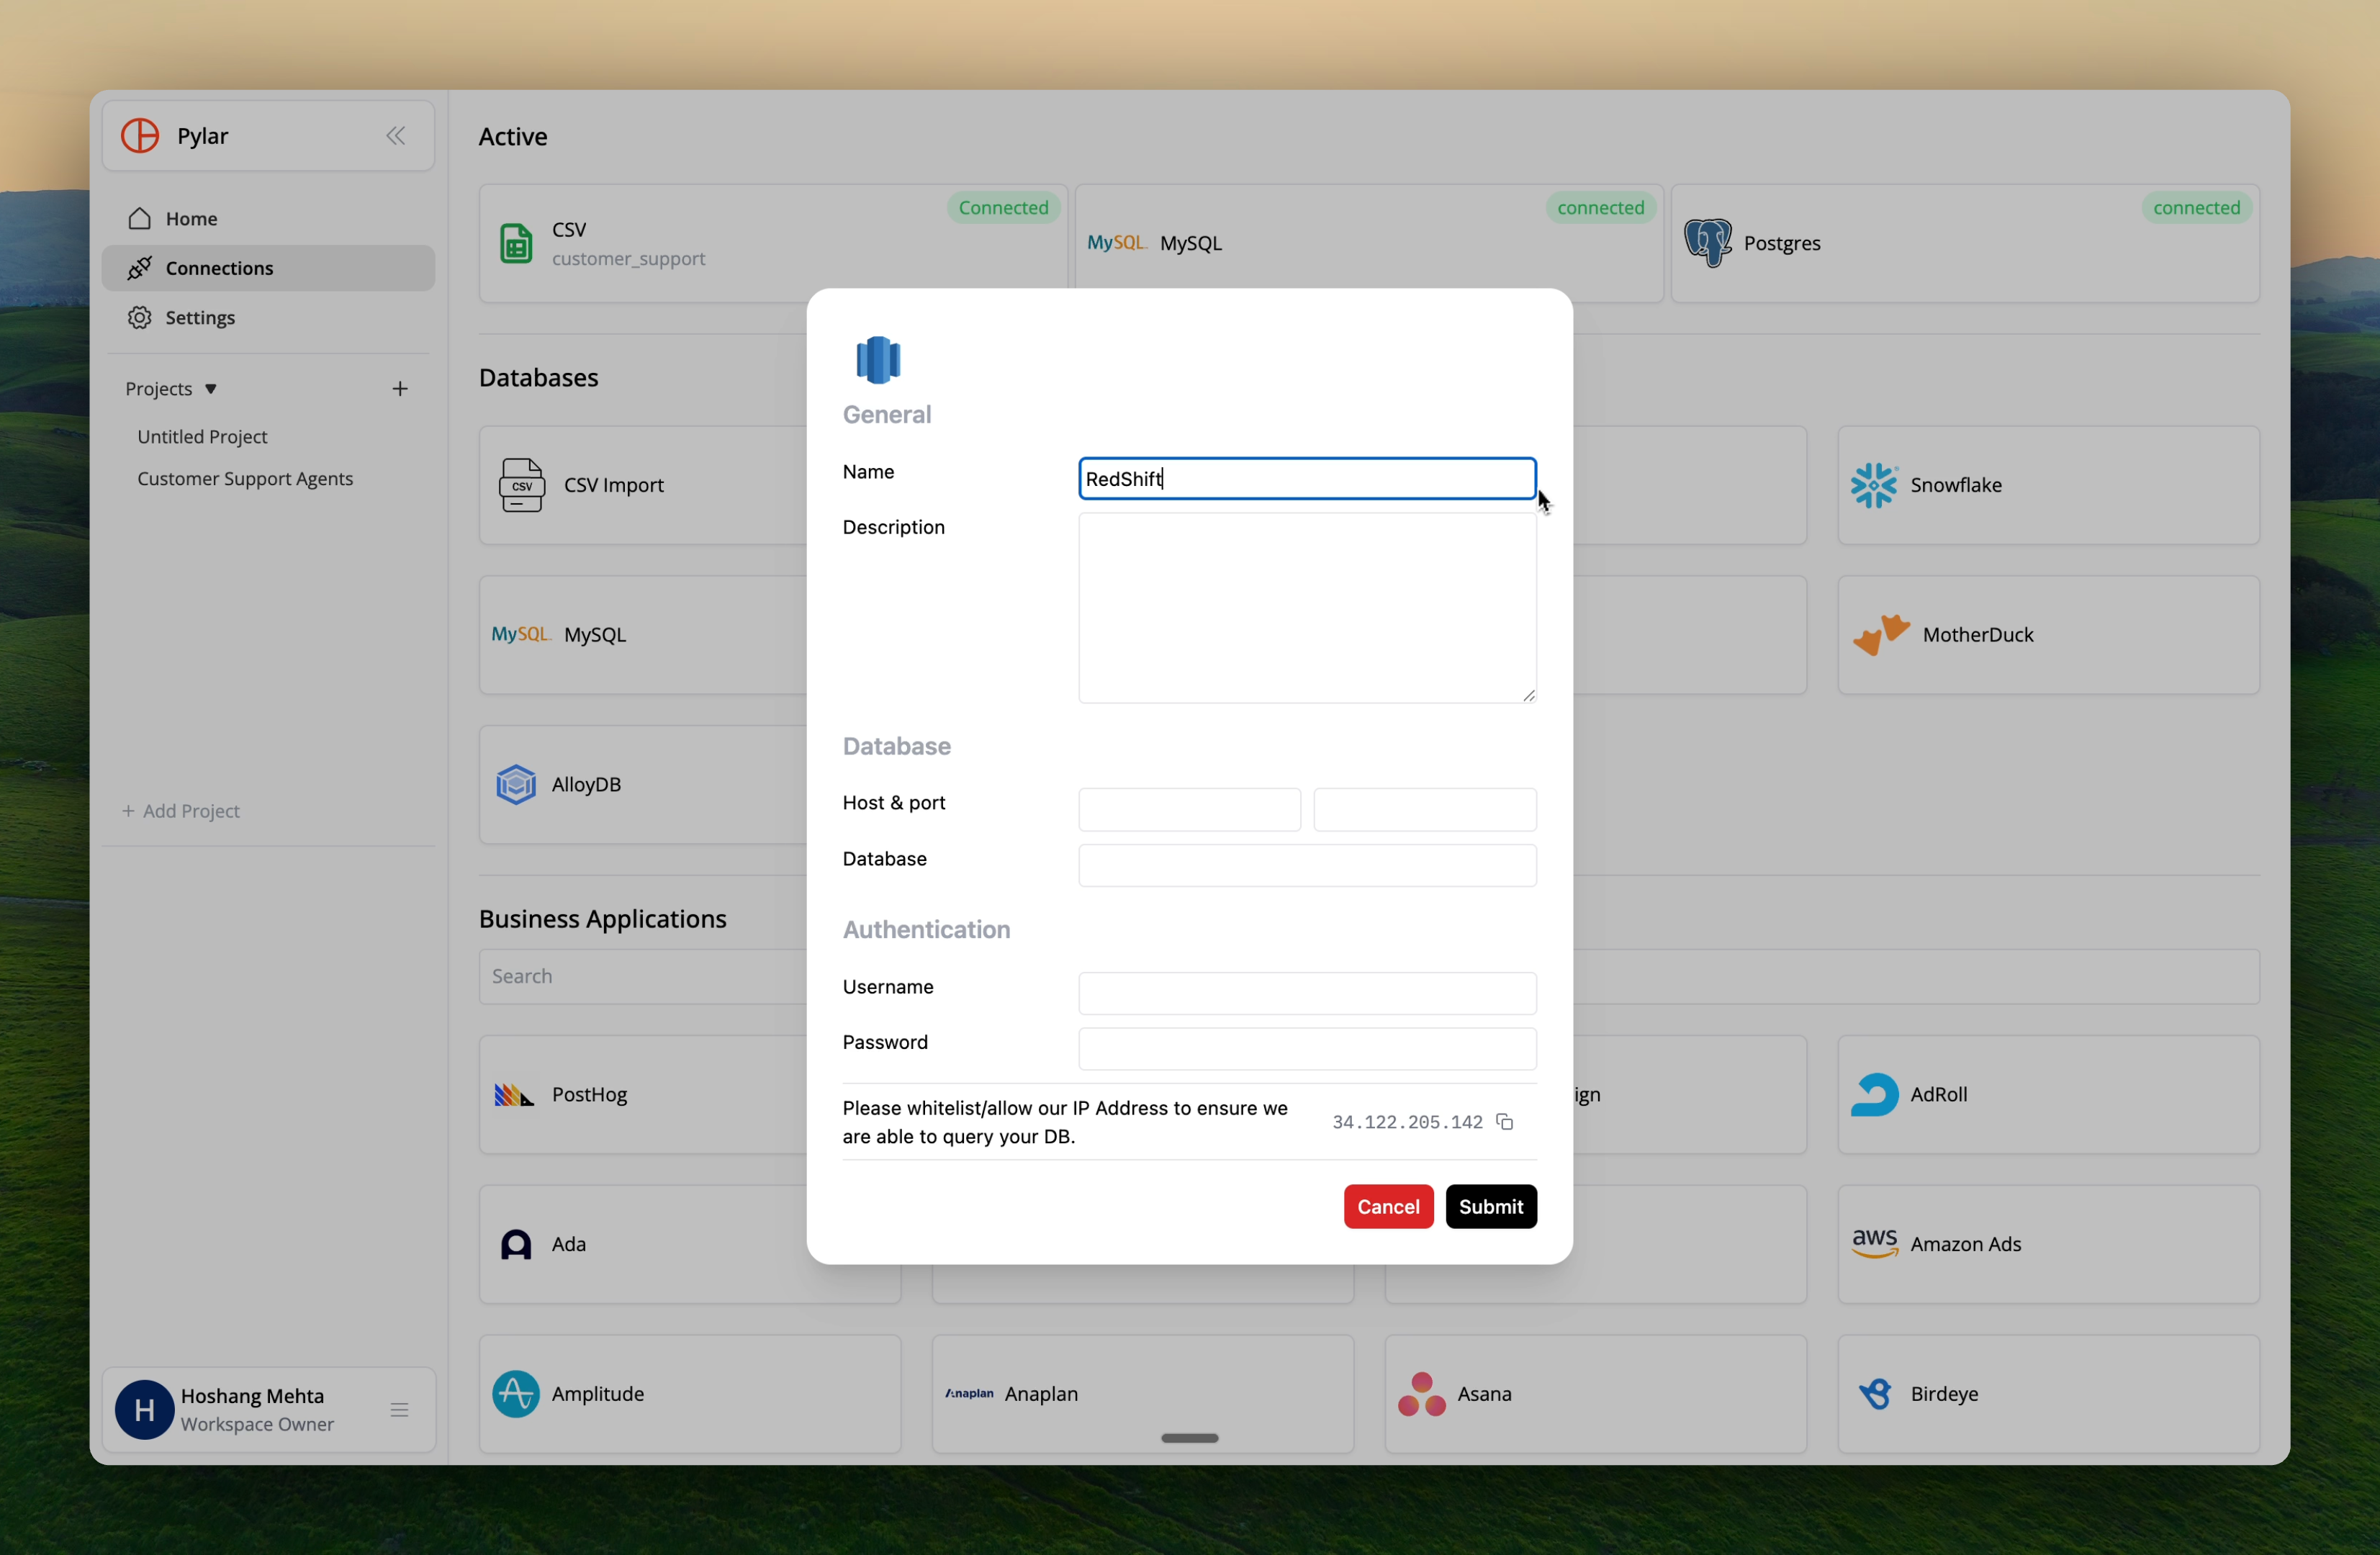 ### Endpoint URL
1. Paste your Redshift endpoint URL into the endpoint field
2. **Remove everything after the colon (`:`)** in the URL
The part after the colon represents the port number. You'll enter the port separately.
**Example**:
* Full endpoint: `my-cluster.abc123.us-east-1.redshift.amazonaws.com:5439`
* After removing port: `my-cluster.abc123.us-east-1.redshift.amazonaws.com`
### Port
Enter the port number for Redshift.
**Default**: `5439`
**Note**: If your endpoint URL had a different port, use that. Otherwise, use the default `5439`.
### Database Name
Enter the name of your Redshift database.
**Example**: `dev`, `production`, `analytics`
### Username
Enter your **AWS username** associated with the Redshift database.
**Note**: This should be a user with appropriate permissions to query the database.
### Password
Enter the **AWS password** corresponding to your Redshift username.
Use a dedicated Redshift user account for Pylar with read-only permissions when possible. This enhances security and allows for better access control.
## Step 6: Whitelist Pylar IP Address
**Critical Step**: Whitelist Pylar's IP address to ensure seamless connectivity.
**Pylar IP Address**: `34.122.205.142`
**How to whitelist in Redshift**:
1. In AWS Console, go to **Redshift** → **Clusters**
2. Select your cluster
3. Go to **Properties** → **Network and security**
4. Click on the **VPC security group** associated with your cluster
5. In the security group, add an **Inbound Rule**:
* **Type**: Redshift
* **Protocol**: TCP
* **Port**: 5439 (or your custom port)
* **Source**: `34.122.205.142/32`
6. Save the security group rules
Without whitelisting the IP address, Pylar will not be able to connect to your Redshift database. This step is crucial for establishing a secure and stable connection.
## Step 7: Test Connection
1. Click the **"Test Connection"** button
2. Pylar will attempt to connect to your Redshift database
3. If successful, you'll see a success message
4. If it fails, you'll be prompted to make corrections to your database credentials
A successful connection test means Pylar can reach your Redshift cluster and authenticate. Verify all details are correct before proceeding.
## Step 8: Save and Connect
Once the connection test is successful:
1. Click **"Save"** to save your configuration
2. You'll be prompted to give the connection a **schema name**
3. Enter a descriptive name (e.g., `redshift_production` or `analytics_warehouse`)
4. Save the configuration
**Naming Rules**:
* Lowercase letters only
* Numbers and underscores allowed
* No spaces or special characters
## Step 9: Wait for Ingestion
After saving:
1. **Data indexing begins**: Pylar starts indexing your Redshift data
2. **Processing time**: This may take a while depending on the volume of data
3. **Notification**: You'll receive an email notification once data ingestion is complete
If your Redshift data doesn't show up immediately, give it a few minutes. Large databases can take time to index. You'll receive an email when the process is complete.
## Using Your Redshift Connection
Once indexing is complete:
### Query Redshift Data
Reference your connection by the schema name you provided:
```sql theme={null}
SELECT *
FROM redshift_production.public.customers
WHERE region = 'us-east';
```
### Join with Other Sources
Join Redshift data with other connected sources:
```sql theme={null}
SELECT
rs.customer_id,
rs.total_revenue,
hs.email,
sf.opportunity_value
FROM redshift_production.customers rs
JOIN hubspot.contacts hs ON rs.email = hs.email
JOIN snowflake.opportunities sf ON rs.customer_id = sf.account_id;
```
## Troubleshooting
### Issue: Connection test fails
**Solutions**:
* Verify endpoint URL is correct (without port)
* Check port number (default 5439)
* Ensure IP address `34.122.205.142` is whitelisted in security group
* Verify database name exists
* Check username and password are correct
### Issue: "Connection timeout" error
**Solutions**:
* Verify Redshift cluster is publicly accessible
* Check security group allows inbound connections on port 5439
* Ensure IP address is whitelisted
* Review VPC network configuration
### Issue: "Authentication failed" error
**Solutions**:
* Verify AWS username and password are correct
* Check user has necessary permissions
* Ensure user is not locked
* Review Redshift user permissions
### Issue: "Network or security block" error
**Solutions**:
* Confirm IP address `34.122.205.142` is whitelisted in security group
* Check security group rules allow Redshift protocol
* Verify cluster is publicly accessible
* Review VPC and subnet configurations
## Best Practices
### User Account Security
* ✅ Create a dedicated Redshift user for Pylar
* ✅ Grant only SELECT permissions (read-only)
* ✅ Use IAM roles when possible
* ✅ Regularly audit user permissions
### Network Security
* ✅ Whitelist only Pylar's IP address
* ✅ Use VPC security groups for access control
* ✅ Monitor connection logs
* ✅ Review failed connection attempts
## Next Steps
Now that Redshift is connected:
* [Creating Data Views](/learn/creating-data-views/overview) - Create views using Redshift data
* [Cross-Database Joins](/learn/creating-data-views/cross-database-joins) - Join Redshift with other sources
* [Connection Security](/learn/making-connections/connection-security) - Secure your connections
Use your Redshift connection to create data views
### Endpoint URL
1. Paste your Redshift endpoint URL into the endpoint field
2. **Remove everything after the colon (`:`)** in the URL
The part after the colon represents the port number. You'll enter the port separately.
**Example**:
* Full endpoint: `my-cluster.abc123.us-east-1.redshift.amazonaws.com:5439`
* After removing port: `my-cluster.abc123.us-east-1.redshift.amazonaws.com`
### Port
Enter the port number for Redshift.
**Default**: `5439`
**Note**: If your endpoint URL had a different port, use that. Otherwise, use the default `5439`.
### Database Name
Enter the name of your Redshift database.
**Example**: `dev`, `production`, `analytics`
### Username
Enter your **AWS username** associated with the Redshift database.
**Note**: This should be a user with appropriate permissions to query the database.
### Password
Enter the **AWS password** corresponding to your Redshift username.
Use a dedicated Redshift user account for Pylar with read-only permissions when possible. This enhances security and allows for better access control.
## Step 6: Whitelist Pylar IP Address
**Critical Step**: Whitelist Pylar's IP address to ensure seamless connectivity.
**Pylar IP Address**: `34.122.205.142`
**How to whitelist in Redshift**:
1. In AWS Console, go to **Redshift** → **Clusters**
2. Select your cluster
3. Go to **Properties** → **Network and security**
4. Click on the **VPC security group** associated with your cluster
5. In the security group, add an **Inbound Rule**:
* **Type**: Redshift
* **Protocol**: TCP
* **Port**: 5439 (or your custom port)
* **Source**: `34.122.205.142/32`
6. Save the security group rules
Without whitelisting the IP address, Pylar will not be able to connect to your Redshift database. This step is crucial for establishing a secure and stable connection.
## Step 7: Test Connection
1. Click the **"Test Connection"** button
2. Pylar will attempt to connect to your Redshift database
3. If successful, you'll see a success message
4. If it fails, you'll be prompted to make corrections to your database credentials
A successful connection test means Pylar can reach your Redshift cluster and authenticate. Verify all details are correct before proceeding.
## Step 8: Save and Connect
Once the connection test is successful:
1. Click **"Save"** to save your configuration
2. You'll be prompted to give the connection a **schema name**
3. Enter a descriptive name (e.g., `redshift_production` or `analytics_warehouse`)
4. Save the configuration
**Naming Rules**:
* Lowercase letters only
* Numbers and underscores allowed
* No spaces or special characters
## Step 9: Wait for Ingestion
After saving:
1. **Data indexing begins**: Pylar starts indexing your Redshift data
2. **Processing time**: This may take a while depending on the volume of data
3. **Notification**: You'll receive an email notification once data ingestion is complete
If your Redshift data doesn't show up immediately, give it a few minutes. Large databases can take time to index. You'll receive an email when the process is complete.
## Using Your Redshift Connection
Once indexing is complete:
### Query Redshift Data
Reference your connection by the schema name you provided:
```sql theme={null}
SELECT *
FROM redshift_production.public.customers
WHERE region = 'us-east';
```
### Join with Other Sources
Join Redshift data with other connected sources:
```sql theme={null}
SELECT
rs.customer_id,
rs.total_revenue,
hs.email,
sf.opportunity_value
FROM redshift_production.customers rs
JOIN hubspot.contacts hs ON rs.email = hs.email
JOIN snowflake.opportunities sf ON rs.customer_id = sf.account_id;
```
## Troubleshooting
### Issue: Connection test fails
**Solutions**:
* Verify endpoint URL is correct (without port)
* Check port number (default 5439)
* Ensure IP address `34.122.205.142` is whitelisted in security group
* Verify database name exists
* Check username and password are correct
### Issue: "Connection timeout" error
**Solutions**:
* Verify Redshift cluster is publicly accessible
* Check security group allows inbound connections on port 5439
* Ensure IP address is whitelisted
* Review VPC network configuration
### Issue: "Authentication failed" error
**Solutions**:
* Verify AWS username and password are correct
* Check user has necessary permissions
* Ensure user is not locked
* Review Redshift user permissions
### Issue: "Network or security block" error
**Solutions**:
* Confirm IP address `34.122.205.142` is whitelisted in security group
* Check security group rules allow Redshift protocol
* Verify cluster is publicly accessible
* Review VPC and subnet configurations
## Best Practices
### User Account Security
* ✅ Create a dedicated Redshift user for Pylar
* ✅ Grant only SELECT permissions (read-only)
* ✅ Use IAM roles when possible
* ✅ Regularly audit user permissions
### Network Security
* ✅ Whitelist only Pylar's IP address
* ✅ Use VPC security groups for access control
* ✅ Monitor connection logs
* ✅ Review failed connection attempts
## Next Steps
Now that Redshift is connected:
* [Creating Data Views](/learn/creating-data-views/overview) - Create views using Redshift data
* [Cross-Database Joins](/learn/creating-data-views/cross-database-joins) - Join Redshift with other sources
* [Connection Security](/learn/making-connections/connection-security) - Secure your connections
Use your Redshift connection to create data views